Wednesday, August 31, 2011

Adding Passwords to a WCF Service

I recently set up a WCF service that required password protection, with user accounts and passwords synchronized with an ASP.NET site using the standard ASP.NET Membership provider. I found several books and a number of blogs that gave helpful examples, but ultimately I felt that I never found the one, single, go-to example that just focused on the topic of adding username and password support in WCF. So this is my humble attempt at a stripped down, laser focused tutorial on the subject.

Prerequisites

Here is a prioritized checklist for your implementation:
  1. Understand that you will need SSL. WCF will not allow you to add username/password authentication to a service unless it is encrypted at the transport layer; this means that you must use the HTTPS protocol and you must obtain an SSL certificate. For those of you who are students or cheapskates, it is possible to generate a self signed SSL certificate. If you're a professional developer with control of your own DNS domain, I recommend that you think about just getting a real trusted certificate for your test server. Given the low cost of a certificate from a trusted authority, this can wind up saving time and therefore money in the long run. In any case, don't even think about proceeding until you've taken care of this issue.
  2. Use the basicHttpBinding. The default binding for a WCF service application in Visual Studio is the wsHttpBinding. If you use the ws binding and add passwords, you get a session based protocol in which the client and server first negotiate a shared secret, then use the shared secret to sign all subsequent messages. This is a triumph of technology and generally not a problem if you can be absolutely sure that only .NET programmers will access your service. However, the minute a PHP, Rails, Java, or Phython team tries to work with your service you'll get an earful: it can be very challenging to set up session based WS authentication with these frameworks. On the other hand, if you use the basic binding, you'll get stateless authentication that behaves much closer to expectations and is much easier to implement on other platforms.
  3. Make sure you understand how the ASP.NET membership service is configured. Both the membership and role providers should have configuration elements in your web.config file (don't rely on the default configuration). Take note of the applicationName configuration attribute and its function (short story: it is possible for multiple user name directories to coexist in the same database using different application names). The main point is: if you want your service to synchronize with a website, but the service is not directly a part of that website, you must make sure that both the membership connection string and the application names match.
Now that we've got the preliminaries out of the way, all we need is the configuration file, right? After all, can't all WCF issues be solved in the configuration file? With that in mind, I've prepared a stripped down configuration that contains only what you need to enable the ASP.NET membership passwords for a WCF service:
<?xml version="1.0"?>
<configuration>
  <connectionStrings>
    <add name="YOUR_CONNECTION_STRING"
         connectionString="ToDo: put a valid connection string here" />
  </connectionStrings>
  <system.web>
    <compilation debug="true" targetFramework="4.0" />
    <!-- this is the standard role and membership configuration
        that might already be present in your web.config if
        the local ASP.NET site is using the membership
        framework for page access-->
    <roleManager defaultProvider="AspNetRoleProvider" 
                 enabled="true">
      <providers>
        <clear />
        <add name="AspNetRoleProvider"
             type="System.Web.Security.SqlRoleProvider"
             connectionStringName="YOUR_CONNECTION_STRING"
             applicationName="YOUR_APPLICATION_NAME" />
      </providers>
    </roleManager>
    <membership defaultProvider="AspNetMembershipProvider">
      <providers>
        <clear />
        <add name="AspNetMembershipProvider"
             type="System.Web.Security.SqlMembershipProvider"
             connectionStringName="YOUR_CONNECTION_STRING"
             applicationName="YOUR_APPLICATION_NAME" />
      </providers>
    </membership>
  </system.web>
  <system.serviceModel>
    <behaviors>
      <serviceBehaviors>
        <behavior>
          <!-- no need for http get;
              but https get exposes endpoint over SSL/TLS-->
          <serviceMetadata httpGetEnabled="false" httpsGetEnabled="true"/>
          <!-- the authorization and credentials elements tie
            this behavior (defined as the default behavior) to
            the ASP.NET membership framework-->
          <serviceAuthorization
              principalPermissionMode="UseAspNetRoles"
              roleProviderName="AspNetRoleProvider" />
          <serviceCredentials>
            <userNameAuthentication
                userNamePasswordValidationMode="MembershipProvider"
                membershipProviderName="AspNetMembershipProvider" />
          </serviceCredentials>
        </behavior>
      </serviceBehaviors>
    </behaviors>
    <bindings>
      <!-- this binding configuration stipulates that a
          user name and password are required-->
      <basicHttpBinding>
        <binding>
          <security mode="TransportWithMessageCredential">
            <message clientCredentialType="UserName"/>
          </security>
        </binding>
      </basicHttpBinding>
    </bindings>
    <serviceHostingEnvironment multipleSiteBindingsEnabled="true" />
    <services>
      <!-- in this very simple example we're relying on default 
        binding configuration, behavior, and endpoints-->
      <service name="YOUR_NAMESPACE.YOUR_SERVICE">
        <endpoint binding="basicHttpBinding" 
                  contract="YOUR_NAMESPACE.I_YOUR_SERVICE" />
      </service>
    </services>
  </system.serviceModel>
</configuration>

There's lot's more to say about this topic, including how to use role assignments to authorize service access, but hopefully this will be enough to get you started.

Wednesday, August 3, 2011

Linking LightSwitch Data to Logged in Users

Note: if you like this post be sure to take a look at my October 4th post that contains an enhancement to this technique.

In my presentation LightSwitch in Context (which I will be presenting on Wednesday, September 28 at the Bay Area Database Developers .NET User Group) I demonstrate how LightSwitch can be used to create an administrative interface for a public facing website. In one part of the demo, I create a RIA service that can be used to query for a list of users from the .NET Membership service. I am starting to realize that this little trick can be quite handy, and I've already used in a paying project for a client. It is also a good demonstration of how easy it is to create a RIA service for a read-only data source that is outside of the normal scope of your application. RIA services can be intimidating, but if you know the right steps to follow they can be blown out in a few minutes using Visual Studio templates.

Here's how to create a RIA service that allows access to the current list of users in your application. Note that this only works if your using Forms authentication, i.e. the ASP.NET Membership provider. If you are using Windows authentication, you can do something similar but you'll have to replace the Membership code with calls to Active Directory. Also, this requires the full (Professional or better) version of Visual Studio; you can't create data extensions like this with the standard edition of LightSwitch.

Step 1: Add a WCF RIA Services Class Library to your project

With your LightSwitch application is open in Visual Studio, right-click the Solution icon and select Add->New Project... from the context menu. This will bring up the New Project dialog. Select template type Silverlight, then WCF RIA Service Class Library:


You can see that I'm calling my project UserDataService. After you add the project, you will see that template adds not one but two projects to your solution. One will be called UserDataService and one will be called UserDataService.Web. Since this blog is not discussing the fine points of RIA Services, the only thing you need to know is that you can ignore the UserDataService project completely, we'll be working only with UserDataService.Web.

Step 2: Add Membership Provider Assemblies

By default a RIA Services library doesn't have references to the library that implement the ASP.NET membership services. So you'll need to add the following references to the UserDataService.Web project:
  • System.Web
  • System.Web.ApplicationServices

    Step 3: Define Your User Entity

    In order to send a user list back to LightSwitch as a table, you'll need to define a Data Transfer Object (DTO) that will hold data about an individual user. The properties of the DTO will depend on what properties of the user you are interested in. In this example, we're sticking just to the login name:


    using System.ComponentModel.DataAnnotations;
    
    namespace UserDataService.Web
    {
        public class User
        {
            [Key]
            public Guid UserId { get; set; }
    
            public string UserName { get; set; }
        }
    }
    

    Note that we are including the Guid that is used by the Membership framework to uniquely identify users and marking this as the key to the entity. In general, you will always want to define a key for your DTOs.

    Step 4: Create The Service

    Now it's time to create the service itself. Right-click the UserDataService.Web icon and select Add->New Item.. from the context menu. In the Add New Item dialog, select template type Web, and Domain Service Class template:


    In this screenshot, I'm calling my class UserService, however in the example below, I'm using UserData as a class name. Now we get to the fun part, where we actually have to write some code:

    using System.Web.Security;
    
    public class UserData : DomainService
    {
        [Query(IsDefault = true)]
        public IQueryable<User> GetUsers()
        {
            var returnValue = new List<User>();
    
    #if DEBUG
            returnValue.Add(new User 
            {
                UserId = new Guid("{1F43C32F-D6E3-4CCE-A4A0-7BB9D7572C07}"), 
                UserName = "Tom"
            });
    
            returnValue.Add(new User 
            {
                UserId = new Guid("{F4D71F57-2CD1-4C60-B9BE-FA2529A9EE2D}"), 
                UserName = "Dick"
            });
            returnValue.Add(new User 
            {
                UserId = new Guid("{8FF1E47C-BA41-4586-8D23-A3079850FDAA}"), 
                UserName = "Harry"
            });
    #else
            var userList = Membership.GetAllUsers();
    
            foreach (MembershipUser user in userList)
            {
                returnValue.Add(new User 
                { 
                    UserId = (Guid)user.ProviderUserKey, 
                    UserName = user.UserName 
                });
            }
    #endif
    
            return returnValue.AsQueryable();
        }
    }
    
    Here are a couple of things to note:
    1. The Query attribute marks this method as an RIA service method that returns a queryable entity container.
    2. The basic structure of the code, in which you return a list of entities that you want to appear as a table, is extremely simple. You can use this same technique for any kind of data that you want to return as a read-only list.
    3. I've put a DEBUG condition in to populate my list with pretend users. This is important because LightSwitch in debug mode, with Forms authentication enabled, will have a valid Membership provider but won't have any actual users.
    Step 5: Add the Service to LightSwitch

    After you've rebuild your solution to set up the data service (important!), you are ready to add the service as a data source. Right-click on the Data Sources folder in LightSwitch, and select Add Data Source from the context menu. Then, select WCF RIA Service, click Next, then Add Reference, then select the Project tab. You want to add a reference to UserDataService.Web. Then you will be able to select your entity call User. This is a lot of wizard screens, but it goes pretty fast if you've set everthing up according to the instructions above. When you are done, a Users table will appear in LightSwitch, which looks something like this:


    Step 6: Link the User Data to LightSwitch tables

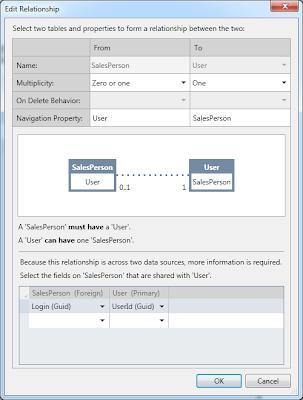
    Now that the Users table exists in LightSwitch, you can link other tables from your main data source. This is slightly different that creating a relationship within the main data source, because you have to create a foreign key in the linked table yourself. Recall that we're using a Guid as a key, so we'll want the foreign key to also be a Guid. In this example I'm linking to the SalesPersons table, so I want to create a new column call Login in SalesPersons of type Guid. Here's what the relationship dialog looks like when the relationship is set:


    Now that you've got the data linked, the RIA service data can be used just like any other LightSwitch data. This screen shot shows the selector that is automatically generated for you when the User link is formatted as an Auto Complete Box:


    Hopefully this simple example will get you started with RIA Services extensions. They're not as bad as they look, and when you need 'em, you need 'em.